Create Template
In order for the Excel Import Utility to populate data in MRI Evolution, Import Templates must be created for the appropriate database entities/tables.
The Template will contain all mandatory fields for the MRI Evolution entity plus any optional fields selected by the user to be populated as part of the data import.
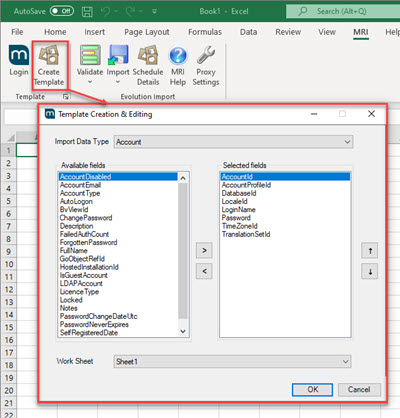
Clicking Create Template opens the window below:
The following list contains the Import Data Types available, this can and will change with MRI Evolution releases over time:
- Account
- Area
- Area Type
- Asset
- Asset Class Group
- Asset Class Group Class
- Asset Classification
- Asset Group
- Asset Name
- Asset System
- Asset Tag
- Asset Type
- Assign Cost Centre To Contract
- Assignment Types
- Attribute Group
- Attribute Lookup Value
- Attribute Value
- Building
- Building Assignment To Resource
- Building Floor
- Building Status
- Building Type
- Calendar
- Calendar Date
- Calendar Day
- Calendar Day Session
- Calendar Session
- Caller Source
- Connection
- Contact
- Contact Linker
- Contract
- Contract Asset Tag View
- Contract Building View
- Contract Category View
- Contract Instruction Set View
- Contract Priority View
- Contract Supplier
- Cost Centre
- Cost Code
- Country Library
- Department Location
- Discipline Register
- Event
- Fault Codes
- Floor
- Hazard / Alert
- Identity Tag
- Instruction
- Instruction Set Group
- Instruction Step
- Location
- Location Type
- Master Schedule Of Rates Group
- Mobile Audit Template Assignment
- Mobile Schedule Audit
- Mobile Schedule Audit Item
- Network
- Permit Template
- PMS Core Value Date
- PMS Core Value Group
- PMS Core Values
- PMS Priority
- PMS SLS
- Portfolio
- Portfolio Building
- Portfolio Type
- PPM
- PPM Action
- PPM Resource
- Priority
- Purchase Order
- Purchase Order Item
- Region
- Region Country
- Region Type
- Resource
- Resource Skill
- Schedule Of Rates
- Schedule Of Rates Category
- Schedule Of Rates Sub Category
- Scheduled Task Template
- Seasonal PPM
- Site
- Skill
- Skill Requirement
- Stock Detail
- Stock Received
- Supplier
- Task Action
- Task Category
- Task Event Types
- Time Record Resolution
- Time Record Status
- Visitor
- Work Permit
Once an Import Data Type is chosen, mandatory/required fields are added automatically to the Import Template (right hand panel) and can't be removed to ensure data integrity.
All other optional fields for the selected Data Type are available in the left hand panel, except system fields (CreatedDate, ModifiedDate, Deleted and Version).
Optional fields can be highlighted individually or in multiples using the SHIFT or CTRL keys. Pressing the arrow pointing to the right will add highlighted values to the Import Template. To remove optional fields, highlight the fields on the right hand side and press the arrow pointing to the left.
Clicking a field in the right panel and using the up and down arrows on the far right allows the order of the values to be changed in the Import Template.
The Work Sheet field allows users to:
-
specify the existing Excel Worksheet the Template should be created in
-
or choose to create a new worksheet
When the OK button is clicked the Structural Validation Check is run. This ensures that columns are self-consistent (see Validate Button for more details).
If the validation fails the spreadsheet will not be created, instead you will be alerted of missing fields.
If the validation succeeds a column for each field will be created with rows for the following data:
-
Field name
-
Data type
-
System flag (Required/Key Field)
A confirmation pop up will be displayed if successful and the spreadsheet updated to show the template:
Below is an example of an Import Template for Assets:
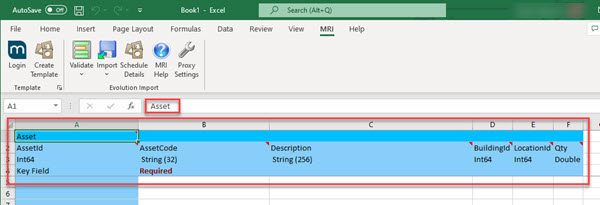
The first column is a read only KeyField column and is used to show the results of validation or imports.
The resulting spreadsheet is protected to maintain integrity. New columns cannot be added manually. Use the Create Template button to add or remove columns.